The Export for cutting dialog
Export for cutting (DXF)… in the export menu opens the Export for cutting window. It makes a file for a laser or CNC machine to cut your design out of wood, acrylic or metal. Before you cut, it checks the design for the things that go wrong on the machine, and fixes what it can.
Which plan you need
The window itself is open to everyone: check your design, watch the cut line, read the warnings and fix them, whatever plan you are on.
Only Download DXF is restricted. Laser cutting export sits on the Studio plan today, so on Free or Pro the download is locked and offers the upgrade instead. The pricing section on the home page has the current state.
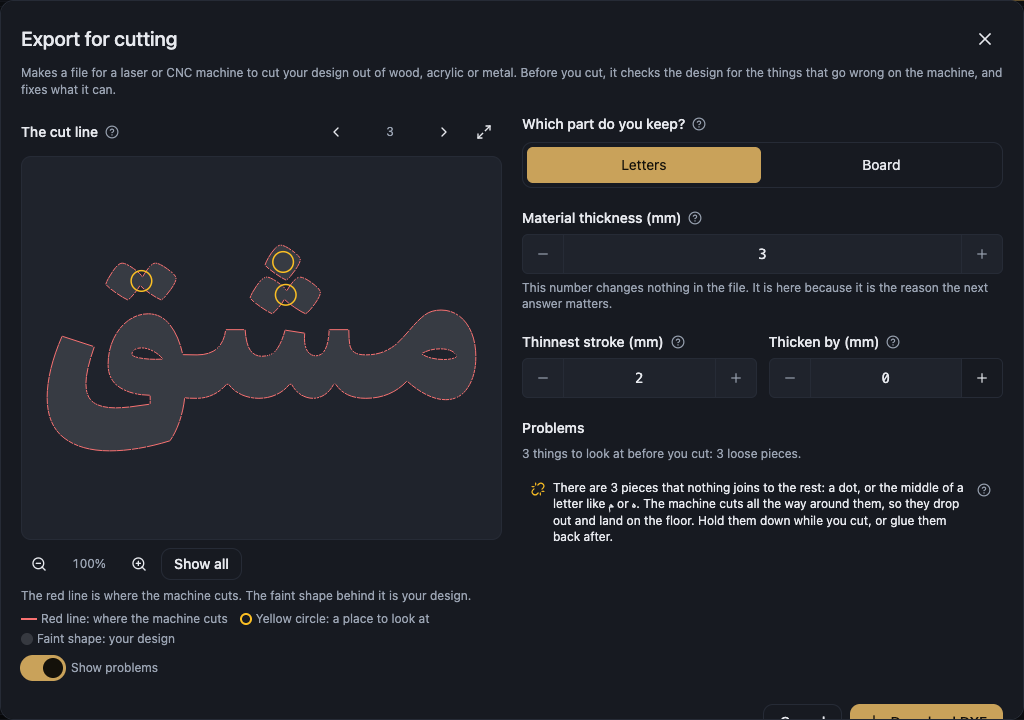
Which part do you keep?
Which part do you keep? is the first question, and the answer decides which pieces fall away when the machine finishes.
Letters: the letters come out as pieces, for wall art or a standing piece. The sheet around them is scrap. Makers call this a positive cut.
Stencil (board): the letters become holes in the sheet, for a stencil or a panel with a light behind it. The sheet is the piece, and the letters fall out. Makers call this a negative cut.
Each option carries that one-line explanation right on the switch, so you never have to guess which is which.
Facts about your material
Material thickness (mm) is how thick your wood, acrylic or metal is. Thicker material needs wider strokes: the beam has to burn all the way through, and a stroke narrower than about two thirds of the thickness chars or breaks, the rule of thumb laser services publish. Setting it fills in Thinnest stroke below with that rule. Once you edit Thinnest stroke yourself, it stays yours and stops following thickness.
Thinnest stroke (mm) is how skinny your letters may get before the material gives up. In 3 mm plywood, parts under about 2 mm break while you lift the piece off the machine. Set it to what your material really holds, and the warnings follow it.
Thicken by (mm) makes every stroke slightly fatter. Use it when the warnings say parts of your letters are too skinny to survive the cut. Your design gets a little bolder, and nothing on your canvas changes.
The cut line
The cut line is a live preview: the red line is exactly where the beam or the bit travels, the faint shape behind it is your design, and yellow circles mark places worth a second look. A short legend under the preview names those three colours.
Scroll or pinch to zoom, at the speed your fingers move, and drag with the hand cursor to move. Show all brings back the whole view, and Zoom in and Zoom out sit alongside.
Your zoom stays where you left it while you change the numbers or press Fix. Only choosing a problem, or Show all, moves the view.
The line is drawn from the same points the file carries, so zoomed all the way in you see the tiny straight steps every cutting file is made of. They are 0.02 mm apart at most, a fifth of a laser beam, and rounded corners keep several points each so nothing comes out chamfered.
Show bigger enlarges the preview panel itself when you want a clearer look.
Show problems turns the yellow circles on and off.
Previous problem and Next problem step through the marked places one at a time, with a counter between them.
Before there is anything to cut, the panel says Nothing to cut yet.
Right under the preview, Finished size gives the width and height of the cut piece in millimetres. The file itself is in millimetres too, so if your machine software asks what unit to import the DXF as, choose mm.
Whenever a setting changes, a small Checking the cut line… note appears over the preview while it re-checks the design, and Download DXF waits until it finishes. Switching between Letters and Stencil (board) does not trigger this: that swap is instant.
Problems
Problems summarises what the check found, in three kinds: skinny spots, loose pieces, and details too small for the machine.
A skinny spot is where a stroke tapers away, or where two strokes pinch together. Wood breaks there first. The window compares the skinniest spot in your design against what you said your material holds.
What counts as a loose piece depends on which part you keep. Keeping Letters, it is a dot or a separate letter: nothing joins it to the rest, the machine cuts all the way around it, and it drops out. Keeping Stencil (board), it is the inside of a letter like م, ه or و, the eye the stroke encloses: that island of board falls out of the stencil. Either way, hold it down while you cut, or glue it back after. A piece already counted as loose is not counted again as a skinny spot.
A too-small detail is narrower than the beam or the bit itself. The machine's beam has a width of its own, and anything narrower than that cannot be cut, however good the machine is. Those details come out as a burn mark, or not at all.
When the design is clean, the window says Nothing to fix. This should cut cleanly.
Fixing
Keeping Letters, Fix sets Thicken by to the value that solves that one warning: enough to bring the skinniest spot up to what your material holds, or enough to make the smallest detail wider than the machine can cut. The button itself says how much it adds, in steps of 0.05 mm, so you can see the amount before pressing and turn Thicken by down afterwards if it feels too bold. Fix all does the same for every warning at once. Some places cannot be saved by thickening, and the window says so plainly: make that part bigger in your design, or take it out.
Keeping Stencil (board), Fix and Fix all are not offered at all. Thickening a stencil makes the openings wider and the board between them thinner, the opposite of a fix, so the skinny-spot row explains this instead and suggests making the letters bolder in the design.
Loose pieces are not a fault a button can repair, because they are simply how the letter is drawn. Handle them at the machine with tape or weights, or with glue afterwards.
Downloading
Download DXF saves the machine file to your device. It is the only part of this window that needs the Studio plan today.
The file is a DXF in AutoCAD 2000 format, in millimetres, with the drawing placed at the origin so its lower-left corner sits at 0,0, and one closed line per shape. Every common laser and CNC program reads it, including LightBurn, xTool Creative Space and RDWorks. Glowforge is the known exception: it takes no DXF file at all.
If the cut line cannot be built, the window says so and asks you to close it and open it again.