Shapes and pictures
Everything you put on the page that is not text: vector shapes, pictures from your device, tracing a picture into an outline, combining shapes, fitting text inside a shape, and building a medallion.
The fourteen shapes
The Shapes menu drops a vector shape onto the page, and it works on the Free plan. The shapes are Rectangle, Square, Circle, Triangle, Star, Line, Hexagon, Arch, Medallion, Rub el Hizb, Cartouche, Crescent, Diamond and Leaf.
A shape is an ordinary layer: it moves, scales and rotates like any other, and it locks, hides and reorders from the Layers panel.
Appearance: fill, border and thickness
Appearance is where a shape gets its colours. A shape has two entirely separate paints, and each one opens the same paint pop-up described on the Colour and paint page.
Fill is the paint inside the shape, with an On and Off switch. Switch it off and the panel says The fill is switched off. Turn it on to give it colours.
Border is the paint drawn on the shape's edge, with the same switch and the same message: The border is switched off. Turn it on to give it colours.
You cannot switch both off, because a shape with neither is invisible. The panel says so: A shape needs at least one of fill or border.
Thickness is how wide the border line is.
Dials that belong to one shape
Some shapes carry controls of their own, which appear with the right shape and stay out of the way otherwise.
Points is how many tips a star and its relatives have.
Scallops is how many lobes run around the edge, as on a medallion.
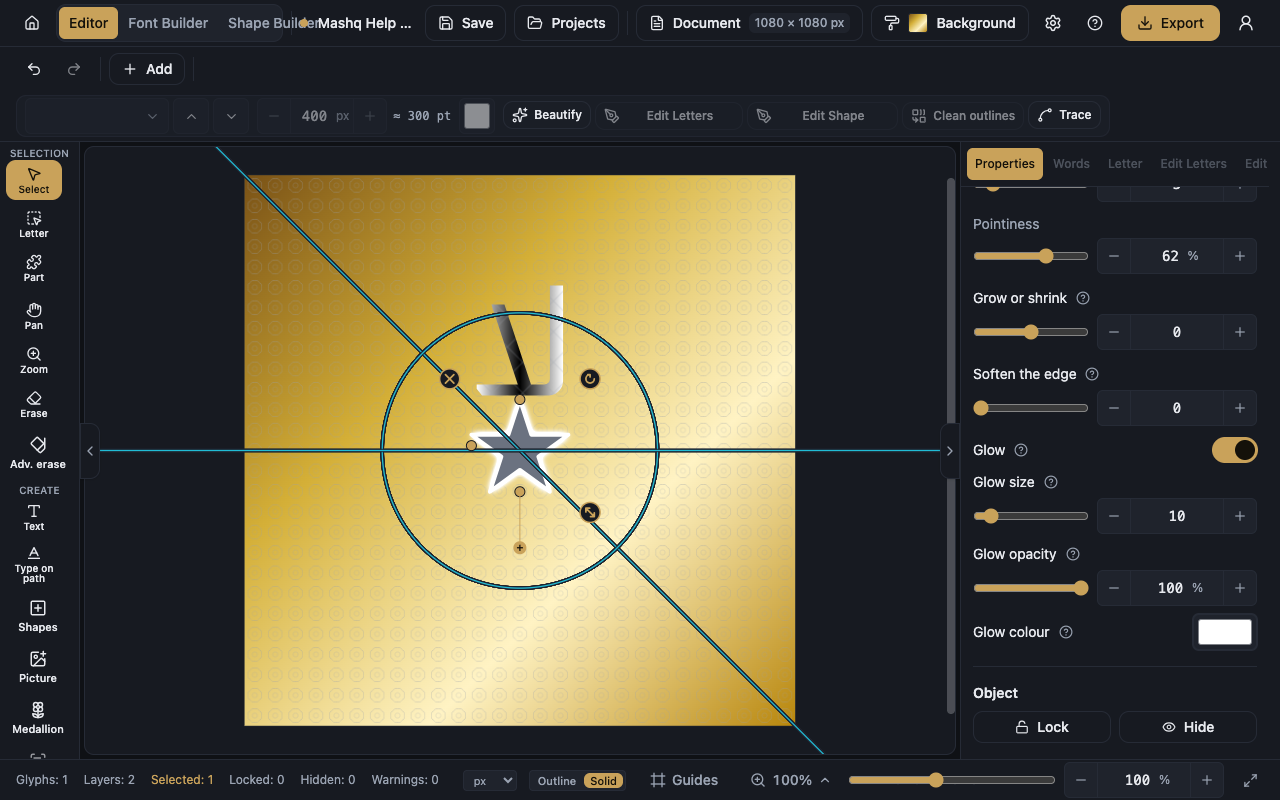
Pointiness is how sharp or how rounded those tips are.
Curve appears only on the Line shape. It bends the straight line into an arc, in either direction: drag one way to bow it up, the other way to bow it down, and back to the middle for a straight line again.
Wave depth and Waves appear only on the Line shape too, right beside Curve. Wave depth pulls the line into even ripples, further out the more you drag, and past the middle the first ripple starts downward instead of up. Waves sets how many complete ripples fit along the line, from one to eight. Both work on top of Curve, so a bowed line ripples along its own arc instead of a straight one.
A selected Line also carries a small hollow ring right on the canvas, riding the curve's own apex. Dragging it bends the line exactly as the Curve dial does, in one motion, and Escape cancels the drag. It stands in place of the two squash dots a straight-edged shape would otherwise show at its top and bottom, because a flat line has nothing there for those dots to squash.
Edge and glow
Grow or shrink moves the shape's edge outward or inward while it stays crisp. The fill and the border move together, and the shape's own box stays exactly where it is.
Soften the edge melts the edge outward so it fades away instead of stopping on a sharp line, and the fill and the border melt together.
Glow is a soft halo spreading out of the outer edge. It does not need a border: with no border the fill's own edge glows, and with a border the border is the edge it spreads from.
Glow size is how far the halo spreads out of the edge.
Glow opacity is how see-through the glow is: full is the whole light, and lower fades it without changing how far it reaches.
Glow colour is the halo's own colour. Leave it on Default and it follows the shape's outer edge: the border's colour when there is a border, otherwise the fill's.
Placing a shape on the page
Fit shape to artboard makes the shape fill the page, in the middle of it. A rectangle stretches to the edges; every other shape keeps its proportions and grows until it touches.
Center shape in artboard puts the shape in the middle of the page at the size it already is.
Combining shapes, and breaking them apart
Merge melts the selected shapes into one clean shape, and the lines where they overlap are removed for real. The result is a layer called Merged shape.
Cut front makes the shapes in front bite into the bottom shape and then disappear. The bottom shape survives with the bite taken out, and is called Cut shape.
Both work on shapes and outline pieces only. If the selection still holds live text, a picture, or a locked layer, the panel says it cannot combine. If the shapes do not overlap it says there is nothing to cut.
Break apart splits one outline layer into its separate parts, and each part keeps its own openings. It needs a single unlocked outline layer with more than one piece in it.
Pictures
Picture places an image from your device on the page, and it becomes a Picture layer that moves and scales like any other. How many pictures you can keep and how big each one may be follow your plan, so check the pricing section on the home page.
Fit artboard to picture makes the page the same shape and size as this picture, and lays the picture back over it exactly.
Choosing an SVG file brings its artwork in as editable vector shapes instead of a picture, sharp at any zoom and ready for colour and Raise. Every shape lands selected together, in one undo step. A plain background rectangle filling the whole file is left out, with a note. An SVG that leans on gradients, embedded pictures, effects, live text, stylesheets, repeated symbols, masks, patterns or markers, or one with far more parts than shapes can reasonably hold, is offered as an ordinary picture instead, with the reason named.
If the picture is bigger than your plan allows, the app says This picture is too big and offers to shrink it. If the file type cannot be used as it is, it offers to convert it. Either way you get two answers: Make it smaller for me, or Choose another picture. If it is still too big at its smallest, the app asks you for a smaller one.
If the file cannot be opened at all, the app says That file couldn't be read as a picture. An SVG file that is too large or damaged gets its own plain refusal instead of being guessed at.
A picture shows the colours it came with, so the paint pop-up does not paint it.
Trace
Trace turns a picture into a vector outline you can colour, reshape and edit point by point. The outline stays inside this project and is never added to a font, and nothing on the canvas changes until you press Trace picture.
Tracing comes with a paid plan, and how many traces you get each month follows your plan. On a plan without it, the app says tracing comes with a paid plan and offers the upgrade. Once the month's traces are used up, every Trace button greys the same way and names the limit your plan carries, so you are told before you press instead of after. The details live in the pricing section on the home page.
Import and trace, in the Add menu, picks a photo and traces it right away, placing only the outline on the artboard.
Six presets set the quality for you by the kind of picture: Balanced, Logo, Line drawing, Sketch, Photo and Maximum detail.
Quality controls are the detailed dials underneath. Light / dark balance sets the line between ink and background, Auto threshold leaves that choice to the app, Invert (light on dark) is for a picture whose ink is light on a dark background, Smooth trades rounder edges against sharper ones, Despeckle (remove specks) clears tiny dots of noise, and Simplify uses fewer points for a cleaner, lighter outline, though too much of it loses detail.
Show the picture behind keeps the original faintly under the result so you can compare, with Zoom in, Zoom out and Fit to inspect the detail. The preview recalculates with every change.
If the picture carries more detail than tracing can handle, the app suggests the Photo setting, or raising Despeckle and Simplify.
Tracing needs a picture selected on the canvas and not locked. If the layer is locked, the app asks you to unlock it first.
Fit text inside a shape
Fit inside shape pours a text layer into a circle, oval, square or rectangle, and the text stays editable afterwards. Select both layers together: hold Shift and click both objects on the canvas. The result previews live before you apply it.
Layout has three settings. Natural keeps the letters' true proportions, on one line. Fill spreads the text sideways to use more of the shape, still on one line. Lines breaks the sentence into lines that fill the shape, with kashida lengthening the joins to reach each edge.
Inner margin is the space kept between the text and the shape's edge, Text height is how large the letters are inside it, and Line spacing is the gap between lines in the Lines layout.
Apply commits the result and Cancel leaves it. When the button is unavailable the panel says why: more than two layers selected or the wrong two, one of them locked or hidden, an empty text layer, text that is curved or already fitted, or a font that has not finished loading.
Medallion
Medallion turns one word, one shape or one group into a circular or mirrored ornament. It is a paid-plan feature, and the details are in the pricing section on the home page. Before you start, select one word, one shape, or one group on the canvas.
Copies is how many copies go round the ring.
Rotate around the circle lets every copy flow around the ring, the classic medallion. Mirrored pairs makes the copies face each other in true symmetry, the classic muthanna emblem.
Letters face is how each copy is turned, with four settings: Outward, Inward, Upright and Rays.
Spread is how much of the circle the copies occupy, up to Full for a complete ring. Circle size is the diameter of the ring itself.
Word in the center puts a copy at the heart of the ornament, and Center size controls how large it is.
Colorize repaints the ornament from Palette, which holds Original colors, Gold & lapis, Tazhib, Iznik, Andalus, Emerald & gold, Royal, Sunset and Ocean. Opacity fades the result.
Create medallion builds it. What you get is a normal group, so everything stays editable afterwards.