The Layers panel
The Layers panel lists everything you put on the page, top to bottom in the order it is drawn on the canvas. From here you name layers, reorder them, lock them, hide them and group them. Everything on this page works on the Free plan.
Reading the list
Each row is one layer. The row at the top of the list draws over everything else on the canvas; the row at the bottom draws behind everything.
A layer you have not named yet carries a stand-in name such as Text 1, a group carries Group 1, and a shape made by merging several shapes is called United shape. These names tell you what the layer is, and you can replace any of them.
Add to selection puts another layer into whatever is selected right now, so you can work on several layers together without going back to the canvas.
When the project is still empty, the panel says No layers yet.
Adding, renaming and deleting layers
Add text layer creates an empty text layer and drops it into the project, so you can start typing without double-clicking the canvas first.
Rename layer opens the Layer name field so you can give the layer a name that means something to you. The name is yours alone and never appears in an exported file.
Delete layer removes the layer from the project. If you delete something by mistake, step back with undo.
Lock and hide
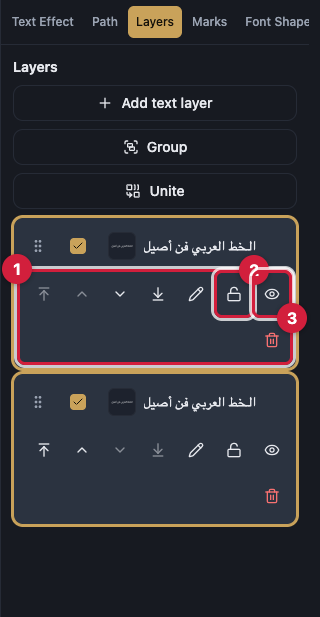
Lock pins the layer so clicking or dragging cannot move or resize it. The button then reads Unlock. A locked layer also drops out of drag-to-reorder: its handle says Locked and asks you to unlock it first.
Hide takes the layer off the screen while it stays in the project, and the button becomes Show. A hidden layer is left out of an export too, which makes it a comfortable way to keep two versions of a composition.
Stacking order
Move up and Move down shift the layer one step in the order.
Bring to front puts the layer above everything, and Send to back puts it behind everything.
Drag to reorder is the handle on each row. Drag it where you want the layer to sit. The handle also works from the keyboard: space or enter picks the layer up, the arrow keys move it, space or enter drops it, and escape cancels. Every step is announced for screen readers.
Groups
Group turns the selected layers into one unit: it moves, resizes, rotates, flips, and takes colors, opacity, and effects together. Ungroup gives you the separate layers back.
Remove from group pulls one layer out of its group and leaves the rest of the group intact.
Collapse group and Expand group fold a group's contents away in the list or open them up again. This tidies a long list and changes nothing on the canvas.
Unite
Unite melts several selected shapes into a single outline called United shape, with one fill and one border. Use it when a composition made of several pieces should behave as one piece you can colour and move.
Unite works on shapes and outlines. If the selection still holds live text, a picture, or a locked layer, the action does not run.